I’ve upgraded to PhotoLab8.
…I can’t help but feel that this is the first topic I’m going to write about in the new year, but because I was off work over winter holiday and spent a lot of time at home, it seems that I’ve tended to write more topics related to software.
I thought it would be a waste of money to upgrade DxO PhotoLab 7, which I had only used for a little over six months and still couldn’t say I had mastered. But I thought that if I was going to buy it anyway, it would be more reasonable to get the new version as soon as possible and use it.
In short, I gave in to the temptation of the Black Friday discount sale and upgraded from ‘7’ to ‘8’. That was nearly two months ago. And as I expected, I still haven’t mastered it enough to be able to really notice the difference from before the upgrade, and I’m just kind of muddling through.
The main features that have been enhanced since the previous version, according to the catalogue, are
– The latest and most powerful noise reduction module, PRIME XD2s
– A loupe function that allows you to enlarge a preview image in part
– A function that allows you to adjust ‘brightness only’ using the tone curve
– A function that allows you to compare different images
Of these, I finally got the chance to test and check the noise reduction in mid-December, and that’s what I’m going to talk about this time. Sorry for the long introduction.
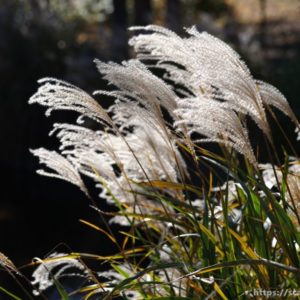
Test Subject 1: Ginkgo leaves on the ground
This photo was taken at ISO 200, but I’ve also tried taking it at ISO 51200 and developing it as-is, and then developing it with noise reduction applied using PRIME XD2.
Wow, this is a real feat.
Incidentally, here’s a comparison between ISO 200 and PRIME XD2.
There is almost no unnatural ‘flatness’ to the image. I was really impressed by how well it managed to remove noise to a level comparable to low-sensitivity photos.
Let’s also check how much progress has been made compared to the old version of PRIME XD, which was implemented in PhotoLab7.
XD has also worked very hard, but when compared, it is clear that XD2s removes noise more thoroughly.
Test subject number 2: The exterior wall of a concrete building.
Incidentally, the wall with the hexagram-like design is the Science Museum in Kitanomaru Park, which will be recognised by those in the know.
Now, as before, we will try to remove the noise from the photo taken with ISO 51200.
The PRIME XD2s does a pretty good job here too. But it might be a little too ‘clean’.
Let’s compare it with ISO 200.
Well, if the ISO 200 photo is more realistic, then the XD2s is still ‘doing too much work’. It has removed the roughness of the concrete wall, leaving a flat ‘coloured-in’ photo.
In the case of a subject that already contains noisy information, such as a rough wall, it may be difficult to adjust the software to ‘leave the original noise and remove only the noise added in the photo’.
What I’ve learned: The noise reduction in PRIME XD2s is quite powerful. However, it is not all-powerful, as there are scenes it is not good at.
I still can’t fully use PhotoLab8, but I am gradually getting a feel for noise reduction. However, the road to mastery is still long. Let’s take our time and see what happens in 2025.
By the way, there was one obvious miscalculation when I upgraded to version 8.
Noise reduction was originally a process that put a heavy load on the equipment, but other operations have also become generally slower, and version 8 is almost unusable on my home sub-PC, which is a notebook PC that I have been able to use to do some paperwork and which does not have a GPU installed. If you ignore the warning that says ‘GPU resources are insufficient’, you can get it to start up somehow, but it’s so slow that you can’t tell whether it’s running or frozen. This is a real problem.
If you’re considering buying it, be careful. This app is machine-specific.